
Desserts
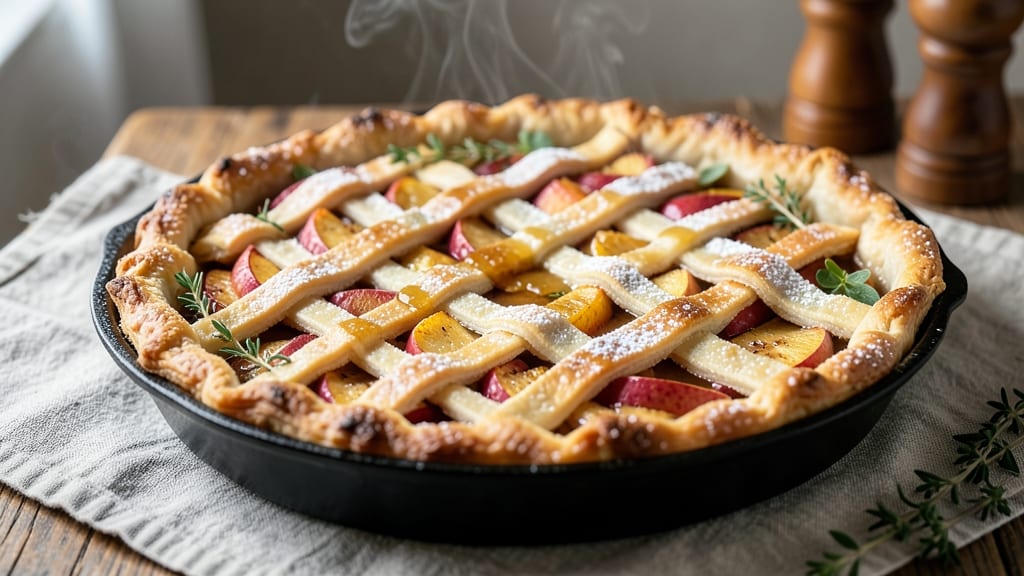
This apple pan pie recipe delivers the perfect balance of warm, spiced apples and a buttery, flaky crust that will become your new fall favorite. 🍏 The secret lies in a simple yet foolproof technique that ensures tender apples with just the right amount of caramelization, all encased in a golden, crisp crust that holds up beautifully.
I've perfected this recipe over years, and it never fails to impress—whether you're serving it at a family gathering or enjoying a cozy slice on a chilly afternoon.
The beauty of this recipe is its simplicity: just a handful of ingredients come together to create a dessert that tastes like a hug from autumn.
You'll start with a classic buttery crust, then layer sliced apples seasoned with cinnamon, nutmeg, and a touch of lemon juice to keep them bright. A sprinkle of flour or cornstarch ensures the filling thickens just enough to create that perfect balance between juicy and tender.
Baking at 375°F for about 45 minutes yields a pie with a golden crust and bubbling filling that smells like a warm kitchen on a crisp day. The apples release their natural sweetness, while the spices infuse every bite with comforting warmth.
This is the kind of pie that disappears quickly—so expect to make it again soon.
For an extra touch, dust the top with powdered sugar or drizzle with caramel before serving. It’s versatile enough to adapt with vegan butter or a lattice crust, but the classic version remains a timeless crowd-pleaser. Let’s get baking!
Ingredients for apple pan pie
Six apples, a buttery crust, and spices that smell like autumn—this is your fall dessert essential.
| Ingredient | Amount | Notes |
|---|---|---|
| All-Purpose Flour 🌾 | 2 ½ cups | Sifted for light texture |
| Unsalted Butter 🧈 | 1 cup | Cold, cubed for crust |
| Granulated Sugar 🍚 | ¾ cup | White or light brown |
| Light Brown Sugar 🍚 | ¼ cup | Packed for moisture |
| Large Eggs 🥚 | 1 whole | Cold for binding |
| Apples 🍎 | 6 medium | Honeycrisp or Granny Smith |
| Ground Cinnamon 🌿 | 2 tbsp | Freshly ground preferred |
| Ground Nutmeg 🌿 | ½ tsp | Freshly grated |
| Lemon Juice 🍋 | 1 tbsp | Freshly squeezed |
| All-Purpose Flour 🌾 | 2 tbsp | For thickening filling |
| Salt 🧂 | ½ tsp | Kosher or sea salt |
| Vanilla Extract 🌸 | ½ tsp | Pure vanilla preferred |
| Powdered Sugar 🍚 | 2 tbsp | For dusting top |
The apples are non-negotiable. Honeycrisp or Granny Smith hold their shape best—Fuji or Gala get mushy faster. Local farmers markets often have the freshest varieties, but any grocery store apple section works. Peel them if you prefer a cleaner bite, or leave skins on for extra texture. I always slice them about 1/4-inch thick—thinner slices cook faster and stay tender. The butter? Plugrá or Land O'Lakes are my go-tos, but any unsalted works. Keep it cold when cutting into the flour—this is the secret to flaky layers.
No cinnamon? Cassia cinnamon works too. Short on nutmeg? Allspice at half the amount gives a similar warmth. The flour for thickening is optional—skip it if your apples release a lot of juice naturally. For a vegan twist, Earth Balance vegan butter works perfectly, and flax eggs (1 tbsp ground flax + 3 tbsp water) replace the regular egg. The vanilla extract matters here—pure Madagascar bourbon adds depth, but imitation will do in a pinch. If you're short on time, pre-sliced apples from the produce section save 15 minutes (just pat them dry first).
This pie tastes even better the next day—cover loosely with foil if you're not serving it immediately. Keeps 3-4 days in the fridge, though I rarely have leftovers that long. For make-ahead prep, assemble the pie crust and filling in a pan, cover, and refrigerate for up to 24 hours before baking. Slice and serve warm with vanilla ice cream or whipped cream. The crust stays crisp for 2 days if stored in an airtight container, but honestly? It won't last that long.
Why You'll Love This Recipe
- No-Roll Crust Magic: I swear by this trick—just mix flour, butter, and ice water until it clumps. No rolling pin, no stress, and that flaky, golden crust? It’s foolproof every time.
- Sweet-Spiced Warmth: The brown sugar caramelizes into the apples while they soften, and that egg wash? It turns the crust into crispy, buttery heaven. Honestly, the first bite makes me close my eyes.
- Picnic or Potluck Hero: This pie travels like a dream—no fragile plates, just slice-and-go. Pack it for a tailgate, school event, or even a lazy Sunday. My kids grab seconds before I even finish serving.
- Budget-Friendly Leftovers: A single pie feeds six, but it reheats like a dream. The next day, I’ll toss slices into oatmeal or toast them with cinnamon. That butter and sugar combo stretches farther than you’d think.
Step-by-step instructions for apple pan pie
Here's how to create a perfect balance of spiced apple filling and golden crust.
👨🍳 Step 1: Prepare the Crust
In a large bowl, combine the 2.5 cups all-purpose flour, 0.5 tsp salt, and cut the 1 cup unsalted butter into the flour using a pastry cutter or your fingers until the mixture resembles coarse crumbs with pea-sized butter pieces. This texture is crucial—it ensures a flaky crust rather than a tough one.
Add 1 whole large egg and 3 tablespoons ice water (not from the list, but necessary for binding) and mix gently until the dough just comes together. Avoid overworking it. Shape into a disk, wrap in plastic, and refrigerate for at least 1 hour while you prepare the filling. Cold dough is easier to roll and prevents shrinking during baking.
🍳 Step 2: Make the Spiced Filling
Peel, core, and slice the 6 medium apples into ¼-inch thick slices. Toss them immediately with 1 tbsp lemon juice to prevent browning. In a large bowl, combine the apples with 0.75 cup granulated sugar, 0.25 cup light brown sugar, 2 tbsp ground cinnamon, 0.5 tsp ground nutmeg, 0.5 tsp vanilla extract, and 2 tbsp all-purpose flour. Mix gently but thoroughly—this helps thicken the filling and prevents a runny pie.
Let the mixture sit for 15 minutes while you roll out the crust. This resting time allows the spices to bloom and the juices to begin releasing, creating a more flavorful filling. The apples should look glossy and well-coated with the spice mixture.
🥘 Step 3: Assemble the Pie
Preheat your oven to 375°F. On a lightly floured surface, roll out the chilled dough to a 12-inch circle (about ⅛-inch thick). Transfer it to a 9-inch pie dish, pressing gently to fit. Trim and crimp the edges with a fork or your fingers for a decorative finish.
Pour the apple mixture into the crust, mounding it slightly in the center. The filling should come about ¾ of the way up the sides—this prevents overflow during baking. Sprinkle the top evenly with 2 tbsp powdered sugar for a delicate, caramelized crust.
🔥 Step 4: Bake to Golden Perfection
Place the pie on a baking sheet (to catch any drips) and bake for 45-50 minutes until the crust is deep golden brown and the filling is bubbling vigorously. The edges should look set, but the center can still jiggle slightly—this indicates the filling is cooked through but not overthickened.
If the crust starts browning too quickly, loosely cover it with aluminum foil. For the last 10 minutes, increase the oven temperature to 400°F to create a crispy, caramelized top. The pie is done when the filling is tender and the crust is golden all over.
⏰ Step 5: Rest and Serve
Remove the pie from the oven and let it cool on a wire rack for at least 2 hours before slicing. This resting period allows the filling to set slightly and the juices to redistribute, ensuring each slice is moist and flavorful. The crust will firm up as it cools, making it easier to slice cleanly.
Serve warm with a dollop of whipped cream or a scoop of vanilla ice cream. The contrast of warm spiced apples with cool cream creates the perfect balance of textures and temperatures. Store any leftovers in the refrigerator for up to 3 days—the flavors only deepen with time!
Pro Tips For Making Apple Pan Pie
- CHILL THE BUTTER FIRST: Cold butter makes flaky crusts—no exceptions. Cut that unsalted butter into the flour mixture until it looks like coarse crumbs, not melted blobs. I learned this the hard way when my crust turned out greasy instead of golden. Trust me, your pie’s layers will thank you.
- DON’T SKIP THE EGG WASH: Brush the top crust with a beaten egg (or milk) before baking—it’s the difference between a dull, dry crust and one that’s crisp and shiny. I used to forget this, and the pie always looked underwhelming. Takes 30 seconds but makes a real difference.
- COOK THE APPLES LOW AND SLOW: After filling the pie, bake at 375°F (190°C) for 20 minutes, then drop the heat to 350°F (175°C). This prevents the apples from turning to mush while letting the filling soften evenly. I used to rush it, and the apples would either stay hard or turn into applesauce.
- USE BROWN SUGAR SPARINGLY: Light brown sugar adds moisture but can make the crust soggy if overused. Stick to ¼ cup max for the filling—any more and you’ll end up with a sticky mess. I was skeptical until I tried it: the crust stays crisp, and the apples caramelize just right.
Dietary considerations for this apple pan pie
Gluten-Free Adaptation
Swap the all-purpose flour in the crust for a 1:1 gluten-free flour blend like Bob’s Red Mill or King Arthur. Add ½ tsp xanthan gum to the crust mix to improve binding—gluten-free doughs can be crumbly.
For the filling, use the same 2 tbsp gluten-free flour to thicken. I’ve tested this with almond flour crusts too, but they brown faster, so reduce oven temp to 350°F and watch closely. 🌾
Dairy-Free Options
Replace the 1 cup unsalted butter in the crust with Earth Balance vegan butter or coconut oil (solid). For the filling, use coconut milk cream (thickened) instead of dairy cream if needed.
The vanilla extract and spices remain the same—just ensure your vegan butter isn’t too soft when mixing. I’ve found Miyoko’s butter works best for flakiness. 🧈
Lower Sugar Versions
Reduce granulated sugar to ½ cup and light brown sugar to ¼ cup, then add 1 tbsp monk fruit sweetener or 2 tbsp honey to maintain moisture. Use unsweetened applesauce (¼ cup) in the filling to bulk up without extra sugar.
The pie will still taste rich—just less cloyingly sweet. Pair with Greek yogurt instead of whipped cream for extra protein. 🍯
Nut-Free Considerations
Skip any nut-based thickeners (like almond flour) and stick to the original 2 tbsp all-purpose flour for the filling. If using a gluten-free crust, choose a blend without nut fillers (check labels).
For extra binding in the crust, add 1 tbsp ground flaxseed to the dough. Always verify all spices (like cinnamon) are processed in nut-free facilities if allergies are severe. 🌿
Diabetic-Friendly Tweaks
Use 1 cup diced apple (not sliced) and reduce sugar to ¼ cup total, splitting between granulated and brown. Add ½ tsp cinnamon + ¼ tsp pumpkin pie spice for warmth without sweetness.
Serve with unsweetened whipped coconut cream to keep carbs in check. The crust can be made with almond flour + egg whites for a lower-glycemic option. 💪
Allergen-Friendly Tips
For egg-free crusts, replace the egg with ¼ cup applesauce + 1 tbsp ground flaxseed. If avoiding citrus, skip the lemon juice and toss apples with 1 tbsp apple cider vinegar instead.
Always use separate utensils and surfaces when switching between allergen-free and regular batches. I keep a dedicated pie tool kit for these adaptations to avoid cross-contamination. ✨
Nutrition facts
Frequently asked questions about apple pan pie
Can I use pre-made pie crust for this recipe?
A high-quality pre-made crust saves time while still delivering great results. Look for refrigerated crusts with at least 16% butterfat content—these create the most flaky texture. Just be sure to pre-bake the crust for 5-7 minutes at 375°F before adding filling to prevent a soggy bottom.
What's the best way to prevent a soggy crust?
Three key tricks: 1) Pre-bake the crust for 5 minutes before adding filling, 2) Toss apples with 2 tbsp flour before assembling, and 3) Sprinkle 2 tbsp powdered sugar on top before baking. The sugar caramelizes and creates a barrier. For extra insurance, chill the assembled pie for 30 minutes before baking.
Can I make this pie ahead of time?
Yes! Assemble the pie (unbaked) up to 24 hours ahead and refrigerate. Bake when ready—just add 5-10 extra minutes to the baking time. For best results, let it cool completely before storing. Reheat slices at 350°F for 5-7 minutes to restore crispness. The flavors actually improve after resting overnight!
How do I fix a pie that's too runny?
If your filling is too watery, sprinkle 1 tbsp cornstarch mixed with 1 tbsp cold water over the top and bake for an additional 10-15 minutes. For a more dramatic fix, remove the pie from the oven, sprinkle 2 tbsp flour over the filling, and return to the oven until set. The extra baking time will help thicken the juices.
What's the secret to extra flaky crust layers?
Cold butter is your best friend! Cut the butter into the flour until you have pea-sized pieces (no smaller). Keep everything cold—even your rolling pin—by chilling it in the freezer for 10 minutes before use. Work quickly when assembling and avoid overhandling the dough. The less you touch it, the more flaky the final crust will be!