
Main Courses
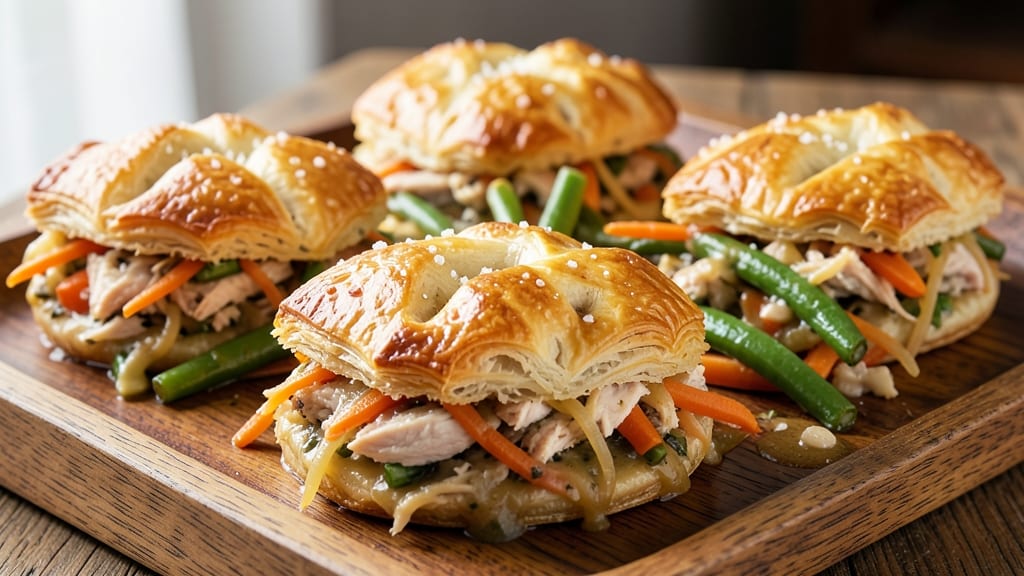
This pot pie bites recipe transforms classic comfort food into perfect handheld portions with a golden, crispy top and rich, savory gravy. 🌟 The secret lies in layering tender chicken, fluffy vegetables, and creamy gravy inside flaky puff pastry, creating bites that are easy to serve and impossible to resist.
What makes these bites special is their foolproof assembly—no fancy techniques required. The filling cooks just until tender, while the puff pastry achieves that signature flaky, golden-brown crust. The result? A restaurant-worthy dish that’s perfect for gatherings, game days, or a cozy weeknight dinner.
Each bite delivers the essence of pot pie—creamy, flavorful, and satisfying—without the mess of a traditional pie. The crispy top contrasts beautifully with the tender filling, making every mouthful a perfect balance of textures and flavors.
Serve warm with a side of green beans or a simple salad for a complete meal. These bites reheat beautifully, so you can make them ahead and keep them warm for hours. Let’s get baking!
Ingredients for pot pie bites
Golden puff pastry meets savory chicken and veggie filling—these bites are comfort food magic.
| Ingredient | Amount | Notes |
|---|---|---|
| Chicken Breast 🍗 | 1 ½ lb | Boneless, skinless, cut into small cubes |
| Puff Pastry Sheets 🍞 | 2 whole | Thawed if frozen, store-bought preferred |
| Fresh Carrots 🥕 | 1 cup | Diced into small pieces |
| Fresh Green Beans 🌱 | 1 cup | Trimmed and cut into bite-sized pieces |
| Yellow Onion 🧅 | 1 whole | Finely diced |
| Garlic Cloves 🧄 | 3 cloves | Minced finely |
| Chicken Broth 💧 | 1 ½ cups | Low-sodium preferred |
| Heavy Cream 🥛 | ½ cup | Full-fat for best texture |
| All-Purpose Flour 🌾 | 2 tbsp | For thickening gravy |
| Butter 🧈 | 2 tbsp | Unsalted, melted |
| Salt 🧂 | 1 tsp | Kosher or sea salt |
| Black Pepper 🌶️ | ½ tsp | Freshly ground |
| Dried Thyme 🌿 | ½ tsp | Or 1 tbsp fresh |
| Dried Parsley 🌿 | ½ tsp | For garnish |
| Egg Wash 🥚 | 1 whole | 1 egg beaten with 1 tbsp water |
The puff pastry is non-negotiable for that signature flaky, golden-brown crust. Pepperidge Farm or Pillsbury are my go-tos—they thaw quickly and deliver consistent results. If you're using frozen sheets, let them sit on the counter for 15 minutes before handling. For the chicken, boneless, skinless breasts cut into small cubes ensure even cooking, while chicken thighs (if you prefer) add extra juiciness but may require an extra 5 minutes in the oven. The carrots and green beans should be bright and firm—no wilted or rubbery veggies here. If you're short on time, frozen peas work in a pinch, but fresh veggies give that restaurant-quality texture.
No heavy cream? Half-and-half or coconut milk will work, though the texture won’t be quite as rich. Running low on chicken broth? Vegetable broth with a splash of cream keeps the flavor profile intact. For the thyme, fresh is ideal, but dried works at one-third the amount—just make sure it’s labeled as culinary thyme, not ornamental. The egg wash is a game-changer for that glossy finish on the pastry. Room-temperature eggs spread more evenly, so take them out of the fridge 10 minutes before using. If you’re feeling fancy, add a pinch of smoked paprika to the egg wash for a subtle smoky note that pairs perfectly with the savory filling.
Assembled bites keep in the fridge for 3-4 days, but they’re best served fresh out of the oven. For make-ahead convenience, prep the filling and pastry separately, then assemble just before baking. The filling reheats beautifully—simmer it on the stove with a splash of broth or water to restore its creamy texture. If you’re prepping for a crowd, bake the bites in batches and keep them warm in a 200°F oven on a wire rack. The crispy tops stay perfect this way, and you can serve them straight from the oven for that just-out-of-the-kitchen appeal.
Why You'll Love This Recipe
- No Chopping Chaos: I slice the onions and carrots in one go—no fancy dice, just quick strips. The green beans barely need prep (trim the ends, done), so you’re actually eating more time than you’re spending cutting.
- Golden Crisp Magic: That puff pastry? It’s the star—flaky, buttery layers that turn crispy in minutes. The chicken stays juicy inside while the edges get that irresistible golden crunch. (Yes, even my picky husband licks the plate.)
- Party in a Bite: These are my go-to for game days, potlucks, or just because. Pop them in the freezer for a last-minute snack, or serve warm at a gathering—no one will guess they’re basically a deconstructed pot pie.
- Leftovers That Don’t Suck: Make a double batch, and you’ve got lunch for days. They reheat like a dream (toaster oven or air fryer, no fuss) and taste just as good cold in a sandwich. Budget win: uses affordable ingredients without feeling cheap.
Step-by-step instructions for pot pie bites
Transform classic pot pie flavors into crispy, handheld bites that deliver all the comfort in every delicious mouthful.
🍳 Step 1: Sear the Chicken and Sauté the Vegetables
Heat a large skillet over medium-high heat and add 1 tablespoon of the butter. Once melted, add the 1.5 lb chicken breast cubes in a single layer. Let them sear undisturbed for 3-4 minutes until golden brown on one side, then flip and cook another 3-4 minutes until fully cooked through. Remove and set aside.
In the same skillet, add the remaining 1 tablespoon butter and the 1 whole yellow onion. Sauté for 4-5 minutes until softened and translucent. Add the 1 cup fresh carrots and 1 cup fresh green beans, cooking for another 5 minutes until the carrots begin to soften. Stir in the 3 cloves minced garlic and cook for 30 seconds until fragrant. Season with ½ tsp salt, ¼ tsp black pepper, ¼ tsp dried thyme, and ¼ tsp dried parsley.
🥘 Step 2: Build the Savory Filling
Return the seared chicken to the skillet and pour in the 1.5 cups chicken broth. Bring to a gentle simmer and cook for 5 minutes to let the flavors meld. Remove from heat and stir in the 0.5 cup heavy cream and 2 tbsp all-purpose flour, whisking until smooth. The mixture should thicken slightly—this forms the rich, velvety gravy that makes pot pie bites so irresistible.
Here's the thing—this gravy is the heart of your bites. If it looks too thick, add 1-2 tablespoons of water to loosen it. If it's too thin, simmer for another minute to thicken. You want it to coat the back of a spoon but still be pourable. Taste and adjust seasoning with more salt or pepper if needed. Let the filling cool for 10 minutes before assembling.
👨🍳 Step 3: Assemble the Bites
Preheat your oven to 375°F. Roll out one of the puff pastry sheets on a lightly floured surface to about ⅛-inch thickness. Use a round cutter or glass to cut out 2-inch circles—you should get about 12-14 circles from one sheet. Place these circles on a parchment-lined baking sheet.
Spoon about 1 tablespoon of the chicken-vegetable filling into the center of each pastry circle. Fold the edges over the filling to create a half-moon shape, pressing gently to seal. Brush the tops with the egg wash—this creates that golden, crispy finish we're after. Repeat with the remaining filling and pastry circles.
🔥 Step 4: Bake to Golden Perfection
Bake the bites for 20-25 minutes until the pastry is deep golden brown and puffed in spots. The filling should be bubbling hot inside, and the edges should look crisp and slightly caramelized. Here's where patience pays off—don't open the oven door early. The heat needs to circulate freely for that perfect rise.
If you notice the tops browning too quickly before puffing, tent them loosely with aluminum foil for the last 5 minutes of baking. Once golden, transfer the bites to a wire rack to cool for 5 minutes. The pastry will firm up slightly as it cools, but it'll still be warm and delicious. Serve immediately with a sprinkle of dried parsley for that final touch of freshness.
Pro Tips For Making Pot Pie Bites
- USE COLD CHICKEN: Toss your cooked chicken breast in ice water for 5 minutes before shredding—it stops the cooking and makes shredding a breeze. I used to struggle with dry, stringy chicken until I tried this; now it stays juicy and pulls apart cleanly.
- TRIM VEGETABLES SMALL: Cut carrots and green beans into ½-inch pieces—any bigger and they’ll stay crunchy or undercook. Onions should be diced fine; I learned this after biting into a tough, half-raw chunk in my first batch.
- BRUSH PASTRY LAST: Skip brushing the puff pastry with egg wash until after baking—it’ll puff better without the moisture weighing it down. Brush right after removing from the oven so it crisps up properly.
- BAKE IN BATCHES: Overcrowding the pan steams the pastry instead of browning it. Bake one sheet at a time on the middle rack for even golden crusts—no one likes soggy tops. (Yes, even if it means two oven loads.)
Make-ahead tips for this dish
Prep Ahead Strategy
Assemble the filling and pastry separately up to 2 days in advance—this is my secret for stress-free gatherings. Store the cooked filling in an airtight container in the fridge, and keep the puff pastry sheets wrapped in plastic.
When ready to bake, simply reheat the filling in a saucepan with 1-2 tablespoons of water to restore its creamy texture. 💡
Freezer-Friendly Assembly
For maximum convenience, assemble the bites completely (unbaked) and freeze them on a parchment-lined tray for 1 hour. Transfer to a freezer bag with parchment between layers to prevent sticking. When ready to bake, thaw in the fridge for 2-3 hours or at room temperature for 1 hour.
Bake straight from frozen at 375°F for 30-35 minutes, adding 5 extra minutes to the cooking time.
Batch Baking Tips
When serving a crowd, bake bites in two batches with a 10-minute rest between batches. Keep the first batch warm in a 200°F oven on a wire rack—this maintains crispiness.
I swear by this method for game day parties, where I can serve fresh, hot bites straight from the oven without a lull in the action. 🏈
Reheating Perfection
Leftover bites reheat beautifully in a 350°F oven for 8-10 minutes until warmed through. For a quick fix, use the microwave on 50% power for 30-45 seconds, then cover with a damp paper towel to restore crispiness.
Avoid steaming—they’ll turn soggy. I always reheat mine this way when I’m short on time.
Storage Secrets
Store baked bites in an airtight container at room temperature for up to 2 days or refrigerate for 4 days. For longer storage, freeze for up to 1 month.
To reheat from frozen, bake at 375°F for 15-20 minutes until golden and bubbly. The pastry stays crispy when reheated properly—this is key for maintaining that restaurant-quality texture. ❄️
Nutrition facts
Frequently asked questions
Can I make these bites with store-bought puff pastry? Store-bought puff pastry is perfect for this recipe—it saves time and delivers that signature flaky, golden-brown crust. Just
How do I prevent the pastry from getting soggy?
The key is to ensure your filling is fully cooled before assembling and to bake the bites until the pastry is deep golden brown. Brush the tops with egg wash right before baking, and avoid overfilling the pastry circles. If reheating leftovers, use the oven or microwave on low power to restore crispiness.
Can I use chicken thighs instead of breasts?
Yes, but adjust the cooking time. Chicken thighs are juicier and may need an extra 5 minutes in the oven to reach 165°F internally. They’ll add richer flavor, though, so it’s worth the trade-off. Just be sure to trim any excess fat to keep the filling light and tender.
What’s the best way to serve these bites?
These bites are perfect for parties, game days, or a cozy dinner! Serve them warm with a side of green beans, a simple salad, or crusty bread to soak up the gravy. For extra flair, garnish with fresh parsley or a sprinkle of smoked paprika. They’re also great for meal prep—just reheat before serving.
Can I make these bites ahead of time?
Yes! Assemble the filling and pastry separately up to 2 days ahead, then bake just before serving. For freezer-friendly prep, assemble the bites completely (unbaked) and freeze them on a tray. Bake straight from frozen at 375°F for 30-35 minutes. This makes them ideal for last-minute gatherings!